Showing posts with label steph ackerman. Show all posts

Monday, December 15, 2014

Knowing You is Happiness


Hi everyone, Steph Ackerman here today using the  Simple Sentiment 3 Clear stamp set in conjunction with Spellbinders dies.


The sentiment from Simple Sentiments 3 fits perfectly in the oval and looks lovely in the center of the embossed and cut die.


Thanks for stopping by today.

Steph

Thursday, December 4, 2014

Happy Birthday

Good morning everyone,  Steph Ackerman here with a birthday card today.  Since it is my husband's birthday, I thought he'd appreciate the few candles I placed!!!!

Have you seen The Stamp Doctor's wide variety of stamps?


This card uses C014 birthday cake and the candles were cut separately and added with foam adhesives for dimension.

 
I added just a hint of color.
 
Thanks for stopping by today.
 
Steph
 

Sunday, November 23, 2014

Beautiful Sunflowers

Good morning everyone,  Steph here with a sunny card for you.

Now that winter has reared it's head, it's nice to be reminded of the sunny days ahead.

Using the long Sunflower stamps, I stamped them four times on 3 different panels of paper.  I cut each layer to line up with the Sunflowers on the previous layer, then matted each piece with black cardstock. 


The center panel of Sunflowers was colored and mounted atop some ribbon for additional dimension.

 
Thanks for stopping by today.
 
Steph
 

Tuesday, November 18, 2014

A colorful Hello

Hi everyone, Steph Ackerman here today just saying hello.

Today, I'm using the  Pop-A-Top 17 and coordinating Spellbinders Labels 17 die.


The Pop-A-Tops make great cards and add in a coordinating Spellbinders die and a beautiful card is the result.
 
Thanks for stopping by today.
 
Steph
 

Monday, November 3, 2014

Hope you have a Bee-utiful day

Hi everyone, Steph Ackerman here today. 

I used the Stamp Doctor Center Step Card Die to create the card in one pass.  It cuts and scores so all you have to do is fold on the score lines and the card is ready to decorate


I used the Center Step Layers to easily die cut all the smaller pieces I needed for the card.
 
The stamp sets I used are C004 Balloon Bees and C017 Bee-utiful Day.
 
Head on over the store and pick up your dies today.  You will be so glad you did.


Monday, October 20, 2014

Hello Flip Flop Card

Hi everyone, Steph Ackerman here today using the Flip Flop 2 die

Have you tried this die yet?  It's amazing.  It cuts the card in one pass.  All you need to do is fold it and decorate it.  Very simple, but oh so much fun.


I cut the cardstock to use as the actual card and then cut the striped pattern paper using the same die to use as the top layer.  I simply trimmed the striped paper to fit it to the card because I wanted a little of the cardstock to show.  Using the included dies, I cut the top layers and stamped Hello on the top layer.


Using Spellbinders Labels 18 dies, I added layers inside the card and stamped Have a Happy Day on the top layer.
 
Thanks for stopping by today.


Monday, October 6, 2014

With Sympathy

Hi everyone, Steph Ackerman here today using the Flip Flop 2 die

Have you tried this die yet?  It's amazing.  It cuts the card in one pass.  All you need to do is fold it and decorate it.  Very simple, but oh so much fun.


I cut the cardstock to use as the actual card and then cut the striped pattern paper using the same die to use as the top layer.  I simply trimmed the striped paper to fit it to the card because I wanted a little of the cardstock to show.  Using the included dies, I cut the top layers and stamped sentiment on the top layer.


Using Spellbinders Labels 18 dies, I added layers inside the card and stamped another sentiment on the top layer.


I added a few pearls around the card to add dimension and detail.
 
Thanks for stopping by today.


Monday, September 22, 2014

Hello, Have a Happy Day

Hi everyone, Steph Ackerman here today using the Flip Flop 2 die.

I love this die.  It's perfect for creating so many types of cards.  Just card the cardstock in one pass, then cut the pattern paper next.


Trim the pattern paper slightly to fit, decorate, adding sentiments and you are done.


Why not pick up this die today and have fun with it.
 
Spellbinders Labels 18 is the die that coordinates with the Flip Flop 2 so the possibilities are endless.
 
Thanks for stopping by today.
 
Steph


Thursday, September 11, 2014

Baby Cards

Hi everyone, Steph Ackerman here today.

Did you know that the Stamp Doctor carries her own line of rubber stamps?  These stamps are quite detailed and come in a variety of sizes, designs  and fonts.

Check out these baby Girl and baby Boy stamps.  Aren't they cute?


Stop by the store to see all the stamps available.
 
Thanks for stopping by today.
 
Steph
 

Thursday, September 4, 2014

Happy Birthday to you

Hi everyone, Steph Ackerman here today using the original Flip Flop die.


This card was easy to create die cutting the cardstock and pattern paper in one pass.  Just run it through your die cut machine twice for a perfect cut.


Cut apart the second layer and add it to the card.  Stamp and die cut the sentiment and add to the interior with coordinating dies.  Stamp and fussy cut the birthday cake and add it to the exterior, or vice versa.


This die makes it so easy to create a pretty card in no time at all.  Stop by the store and check out the other products available.
 
Steph
 

Saturday, August 30, 2014

Hi, Congratulations

Hi everyone, Steph Ackerman here today.

Have you played with the Pop-A-Top dies yet?  This is Pop-A-Top 18 and it coordinates with the Spellbinders Labels 18 die.


I used a pre-made card and added a layer of cardstock and pattern paper on top.  I just aligned the die on the edge and cut. Since I was cutting through 3 days, I die cut a 2nd time for a clean cut.


To cover the die cut area, I used the Spellbinders coordinating Labels 18 die and also used it to create the border over the pattern paper.


Hi was stamped and die cut into a circle and congratulations was added to the card front with some gems for dimension.

Thanks for stopping by today.

Steph

Friday, August 15, 2014

Fantastic Flourish and Florals

Hi everyone, Steph Ackerman here today with a sweet card using the G023 Dahlia Bouquet in conjunction with some amazing Spellbinders dies.  I LOVE how this card turned out.

Because I wanted to focus on the beautiful Dahlias, I chose to color them with Tombow Markers and then fussy cut.  Once cut, I added them to 3 layers of die cut circles with the top layer on foam adhesives for dimension.


It seemed a little plain, so I used the Spellbinders S2-003 Fantastic Flourish 3 to create a wrought iron feeling for the background.  I die cut it 4 times and they fit perfectly on this 5 1/2" square card.  I just aligned the circles in the center of the card.

 
What do you think? 
 
Thanks for stopping by today.
 
Steph
 

Tuesday, August 5, 2014

A Happy Hello

Good morning everyone,  Steph Ackerman here with a "Z" fold card that is quite easy to create.  The addition of stamps from The Stamp Doctor provide the finishing touch


Cut cardstock 4 1/4" x 11".  
Score at 2 3/4" and 5 1/2".
Fold on the score lines creating the "Z" fold
Add pattern papers on top and wrap a ribbon around the panel

Stamp and die cut the sentiment, adding a touch of color with markers.


Thanks for stopping by today.

Steph

Tuesday, July 29, 2014

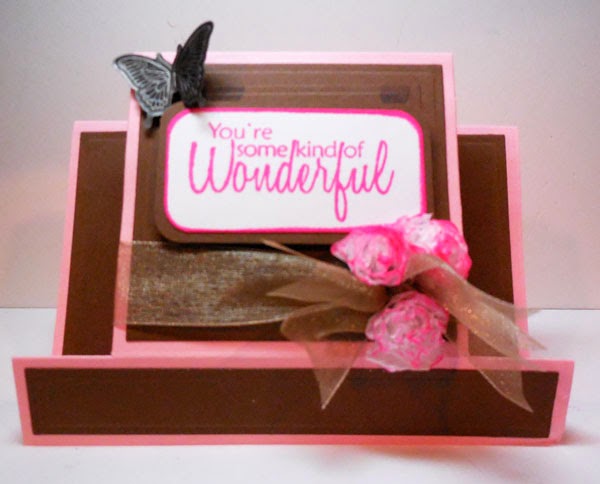
You're Some Kind of Wonderful

Hi everyone, Steph Ackerman here today with another card using lots of The Stamp Doctor dies and stamps:

Center Step Card Die
Center Step Card Die Layers
Bottle Cap and Flower Die Set
Simple Sentiments 2 Clear Stamps


Using the Center Step Card Die, I die cut the card from pink cardstock, then used the Center Step Card Die Layers to create the top layers using brown cardstock.  on the center panels, I stamped the smallest flower from Simple Sentiments 2 stamp set repeatedly to cover. 

Using the Bottle Cap and Flowers Die Set, I die cut approximately 8 layers of tissue paper in one pass and then formed flowers by adding a brad in the center and then fluffing up the tissue layers.  To add color, I lightly spritzed the flowers with water and dabbed some Clearsnap ink  on the flowers.

 
I mixed the flowers around some ribbon I tied around the card, then added the sentiment above which was also stamped with Clearsnap ink and then embossed with clear embossing powder.  A little metal butterfly was the perfect finishing touch.
 
Thanks for stopping by today.
 
Steph
 

Friday, July 25, 2014

Flowers for You

Good morning everyone,  Steph here with a quick and easy card using  G023 Dahlia Bouquet stamps.

The card is approximately 4 1/2" x 5 1/2".  I added a light pink panel approximately 4" x 4" on top and wrapped it with sheer ribbon.  Along the bottom of the card, I added 3 scored lines for a little more dimension.

 
The Dahlias were colored with Copic Markers and die cut with Spellbinders oval dies and added to the pink panel with foam adhesives for dimension.
 
Thanks for stopping by today.
 
Steph
 

Wednesday, July 16, 2014

You make me Smile Center Step Card

Hi everyone, Steph here with a card that was a huge hit at the Syracuse and West Springfield stamp shows. 

I used the Stamp Doctor Center Step Card Die to create the card in one pass.  It cuts and scores so all you do is fold on the score lines and the card is ready to decorate.


I used the Stamp Doctor Fleur de Lis die set, which is a set of 6 dies.  Cutting the central panel and side panels from cardstock, placed them on sticky back paper and added glitter to achieve the fun shimmery look.  You could also do this by placing glitter paper behind the cardstock.

 
The bottom border is also from the Fleur de Lis set, a delicate element that fits the card perfectly.
 
The sentiment is from Simple Sentiments and is a perfect fit in the center of my card.
 
Thanks for stopping by today.
 
Steph


Sunday, June 15, 2014

More Father's Day Cards

Good morning everyone,  Steph here today wishing a Happy Father's Day to all the dads out there.

I've created some more Father's Day cards using the same stamps as I used here, but these cads are horizontal rather than vertical. 


As you can see these stamps are quite versatile.   And when using cardstock, it isn't necessary to color in the images.


Thanks for stopping by today.
 
Steph
 

Thursday, June 12, 2014

Cards for Father's Day

Good morning everyone,  Steph here today and with Father's Day coming soon, it's time to get those Father's Day cards done.

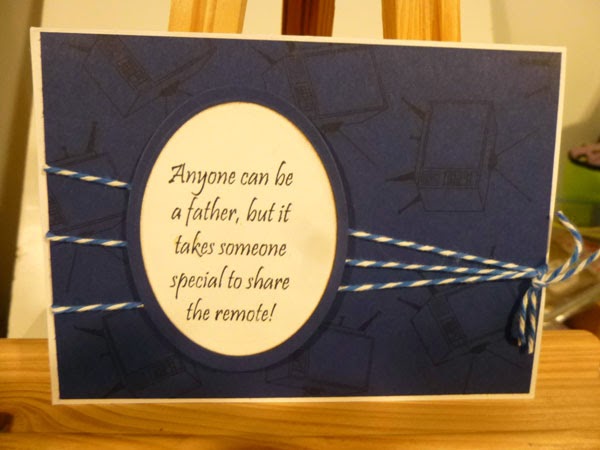
I've used the Father's Day stamps to create these 2 cards.  The backgrounds were created by stamping the old fashioned tvs randomly on the cardstock in black ink. 


The phrase was stamped on white cardstock, die cut into an oval and added to the card front on top of twine that was wrapped around the card.


Kinda cute don't you think??
 
Thanks for stopping by today.
 
Steph
 

Thursday, May 29, 2014

Heartfelt Thanks

Good morning everyone,  Steph here today.  The Stamp Doctor has some wonderful stamps and dies.  Today, I'm use the Pop-A-Top #17. 

I wanted to do something a little different with it, so I created an easel card.  Starting with a 5 1/2' square card, I scored it at 2 3/4" and die cut the Pop-A-Top at the score line.  I used the coordinating Spellbinders Labels 17 to finish off the card.


Another view.  The sentiment on the 1" strip was added with foam adhesives and that helps the easel stand up.  Think of all the fun creations you can do with these dies.


Thanks for stopping by today.  And don't forget to pop by the store to pick up these amazing dies and stamp sets.


Steph

Sunday, May 18, 2014

You Brighten my Day

Good morning everyone,  Steph here to brighten your day.

I used the Poppy corner stamp, coloring it with Copic Markers before die cutting into a circle.  The card was die cut from Spellbinders scalloped circles.


The sentiment is from Simple Sentiments.  Robin's Nest dew drops were added to the center of the flowers for some dimension.

Thanks for stopping by today.