Good morning everyone, Steph Ackerman here with a "Z" fold card that is quite easy to create. The addition of stamps from The Stamp Doctor provide the finishing touch
Cut cardstock 4 1/4" x 11".
Score at 2 3/4" and 5 1/2".
Fold on the score lines creating the "Z" fold
Add pattern papers on top and wrap a ribbon around the panel
Stamp and die cut the sentiment, adding a touch of color with markers.
Thanks for stopping by today.
Steph
Showing posts with label Clear Stamps. Show all posts
Tuesday, August 5, 2014
A Happy Hello
Welcome to my blog. I've been married to Gary for 40 years. We have a 25 year old Criminal Justice college grad and an 18 month old puppy.
I've been creating in some form since I was a child. It started with crochet, sewing, macramé and beading. Turning down a scholarship to the Fashion Institute of Technology, I became a business major managing several major corporations during my career; however, I always kept my crafty endeavors.
I love to teach classes and can be found teaching in my craft room as well as my local stores.
Tuesday, July 29, 2014
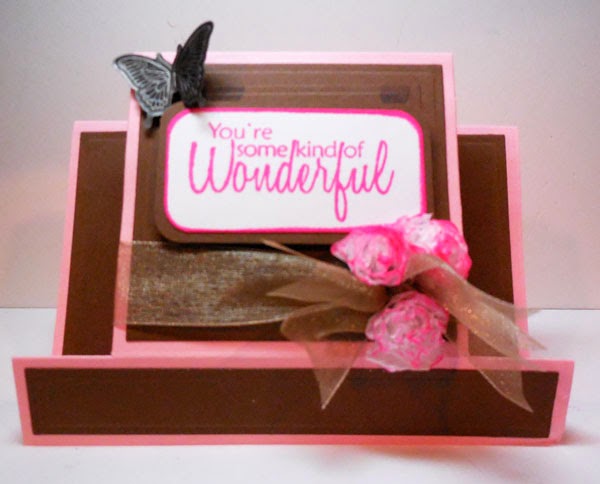
You're Some Kind of Wonderful
Hi everyone, Steph Ackerman here today with another card using lots of The Stamp Doctor dies and stamps:
Center Step Card Die
Center Step Card Die Layers
Bottle Cap and Flower Die Set
Simple Sentiments 2 Clear Stamps
Using the Center Step Card Die, I die cut the card from pink cardstock, then used the Center Step Card Die Layers to create the top layers using brown cardstock. on the center panels, I stamped the smallest flower from Simple Sentiments 2 stamp set repeatedly to cover.
Using the Bottle Cap and Flowers Die Set, I die cut approximately 8 layers of tissue paper in one pass and then formed flowers by adding a brad in the center and then fluffing up the tissue layers. To add color, I lightly spritzed the flowers with water and dabbed some Clearsnap ink on the flowers.
Center Step Card Die
Center Step Card Die Layers
Bottle Cap and Flower Die Set
Simple Sentiments 2 Clear Stamps
Using the Center Step Card Die, I die cut the card from pink cardstock, then used the Center Step Card Die Layers to create the top layers using brown cardstock. on the center panels, I stamped the smallest flower from Simple Sentiments 2 stamp set repeatedly to cover.
Using the Bottle Cap and Flowers Die Set, I die cut approximately 8 layers of tissue paper in one pass and then formed flowers by adding a brad in the center and then fluffing up the tissue layers. To add color, I lightly spritzed the flowers with water and dabbed some Clearsnap ink on the flowers.
I mixed the flowers around some ribbon I tied around the card, then added the sentiment above which was also stamped with Clearsnap ink and then embossed with clear embossing powder. A little metal butterfly was the perfect finishing touch.
Thanks for stopping by today.
Steph
Welcome to my blog. I've been married to Gary for 40 years. We have a 25 year old Criminal Justice college grad and an 18 month old puppy.
I've been creating in some form since I was a child. It started with crochet, sewing, macramé and beading. Turning down a scholarship to the Fashion Institute of Technology, I became a business major managing several major corporations during my career; however, I always kept my crafty endeavors.
I love to teach classes and can be found teaching in my craft room as well as my local stores.
Friday, July 25, 2014
Flowers for You
Good morning everyone, Steph here with a quick and easy card using G023 Dahlia Bouquet stamps.
The card is approximately 4 1/2" x 5 1/2". I added a light pink panel approximately 4" x 4" on top and wrapped it with sheer ribbon. Along the bottom of the card, I added 3 scored lines for a little more dimension.
The Dahlias were colored with Copic Markers and die cut with Spellbinders oval dies and added to the pink panel with foam adhesives for dimension.
Thanks for stopping by today.
Steph
Welcome to my blog. I've been married to Gary for 40 years. We have a 25 year old Criminal Justice college grad and an 18 month old puppy.
I've been creating in some form since I was a child. It started with crochet, sewing, macramé and beading. Turning down a scholarship to the Fashion Institute of Technology, I became a business major managing several major corporations during my career; however, I always kept my crafty endeavors.
I love to teach classes and can be found teaching in my craft room as well as my local stores.
Wednesday, July 16, 2014
You make me Smile Center Step Card
Hi everyone, Steph here with a card that was a huge hit at the Syracuse and West Springfield stamp shows.
I used the Stamp Doctor Center Step Card Die to create the card in one pass. It cuts and scores so all you do is fold on the score lines and the card is ready to decorate.
I used the Stamp Doctor Fleur de Lis die set, which is a set of 6 dies. Cutting the central panel and side panels from cardstock, placed them on sticky back paper and added glitter to achieve the fun shimmery look. You could also do this by placing glitter paper behind the cardstock.
I used the Stamp Doctor Center Step Card Die to create the card in one pass. It cuts and scores so all you do is fold on the score lines and the card is ready to decorate.
I used the Stamp Doctor Fleur de Lis die set, which is a set of 6 dies. Cutting the central panel and side panels from cardstock, placed them on sticky back paper and added glitter to achieve the fun shimmery look. You could also do this by placing glitter paper behind the cardstock.
The bottom border is also from the Fleur de Lis set, a delicate element that fits the card perfectly.
The sentiment is from Simple Sentiments and is a perfect fit in the center of my card.
Thanks for stopping by today.
Steph
Welcome to my blog. I've been married to Gary for 40 years. We have a 25 year old Criminal Justice college grad and an 18 month old puppy.
I've been creating in some form since I was a child. It started with crochet, sewing, macramé and beading. Turning down a scholarship to the Fashion Institute of Technology, I became a business major managing several major corporations during my career; however, I always kept my crafty endeavors.
I love to teach classes and can be found teaching in my craft room as well as my local stores.
Sunday, June 15, 2014
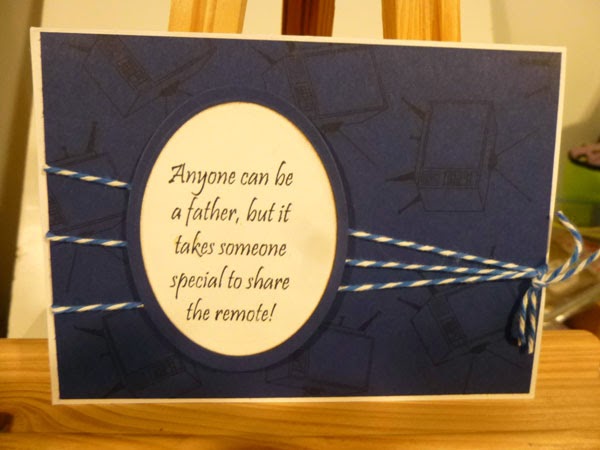
More Father's Day Cards
Good morning everyone, Steph here today wishing a Happy Father's Day to all the dads out there.
I've created some more Father's Day cards using the same stamps as I used here, but these cads are horizontal rather than vertical.
As you can see these stamps are quite versatile. And when using cardstock, it isn't necessary to color in the images.
Thanks for stopping by today.
Steph
Welcome to my blog. I've been married to Gary for 40 years. We have a 25 year old Criminal Justice college grad and an 18 month old puppy.
I've been creating in some form since I was a child. It started with crochet, sewing, macramé and beading. Turning down a scholarship to the Fashion Institute of Technology, I became a business major managing several major corporations during my career; however, I always kept my crafty endeavors.
I love to teach classes and can be found teaching in my craft room as well as my local stores.
Thursday, May 29, 2014
Heartfelt Thanks
Good morning everyone, Steph here today. The Stamp Doctor has some wonderful stamps and dies. Today, I'm use the Pop-A-Top #17.
I wanted to do something a little different with it, so I created an easel card. Starting with a 5 1/2' square card, I scored it at 2 3/4" and die cut the Pop-A-Top at the score line. I used the coordinating Spellbinders Labels 17 to finish off the card.
Another view. The sentiment on the 1" strip was added with foam adhesives and that helps the easel stand up. Think of all the fun creations you can do with these dies.
Thanks for stopping by today. And don't forget to pop by the store to pick up these amazing dies and stamp sets.
Steph
I wanted to do something a little different with it, so I created an easel card. Starting with a 5 1/2' square card, I scored it at 2 3/4" and die cut the Pop-A-Top at the score line. I used the coordinating Spellbinders Labels 17 to finish off the card.
Another view. The sentiment on the 1" strip was added with foam adhesives and that helps the easel stand up. Think of all the fun creations you can do with these dies.
Thanks for stopping by today. And don't forget to pop by the store to pick up these amazing dies and stamp sets.
Steph
Welcome to my blog. I've been married to Gary for 40 years. We have a 25 year old Criminal Justice college grad and an 18 month old puppy.
I've been creating in some form since I was a child. It started with crochet, sewing, macramé and beading. Turning down a scholarship to the Fashion Institute of Technology, I became a business major managing several major corporations during my career; however, I always kept my crafty endeavors.
I love to teach classes and can be found teaching in my craft room as well as my local stores.
Sunday, May 18, 2014
You Brighten my Day
Good morning everyone, Steph here to brighten your day.
I used the Poppy corner stamp, coloring it with Copic Markers before die cutting into a circle. The card was die cut from Spellbinders scalloped circles.
The sentiment is from Simple Sentiments. Robin's Nest dew drops were added to the center of the flowers for some dimension.
Thanks for stopping by today.
I used the Poppy corner stamp, coloring it with Copic Markers before die cutting into a circle. The card was die cut from Spellbinders scalloped circles.
The sentiment is from Simple Sentiments. Robin's Nest dew drops were added to the center of the flowers for some dimension.
Thanks for stopping by today.
Welcome to my blog. I've been married to Gary for 40 years. We have a 25 year old Criminal Justice college grad and an 18 month old puppy.
I've been creating in some form since I was a child. It started with crochet, sewing, macramé and beading. Turning down a scholarship to the Fashion Institute of Technology, I became a business major managing several major corporations during my career; however, I always kept my crafty endeavors.
I love to teach classes and can be found teaching in my craft room as well as my local stores.
Monday, February 3, 2014
Flower Thoughts
Good morning everyone, Steph here again with some wonderful products from The Stamp Doctor.
I created a 5" square card from black cardstock, adding yellow cardstock on top to coordinate with the stamped and colored images. I used - A148 SM Sunflower Bouquet - 3 times, coloring them with Copic Markers, then used them as strips to create the card.
Some yellow ink around each strip and the sentiment brought all the pieces together nicely.
The sentiment is - B101 Beautiful Flower. I die cut, inked it and tied it the ribbon I wrapped around the card.
I created a 5" square card from black cardstock, adding yellow cardstock on top to coordinate with the stamped and colored images. I used - A148 SM Sunflower Bouquet - 3 times, coloring them with Copic Markers, then used them as strips to create the card.
Some yellow ink around each strip and the sentiment brought all the pieces together nicely.
The sentiment is - B101 Beautiful Flower. I die cut, inked it and tied it the ribbon I wrapped around the card.
Thanks for stopping by today.
Steph
Welcome to my blog. I've been married to Gary for 40 years. We have a 25 year old Criminal Justice college grad and an 18 month old puppy.
I've been creating in some form since I was a child. It started with crochet, sewing, macramé and beading. Turning down a scholarship to the Fashion Institute of Technology, I became a business major managing several major corporations during my career; however, I always kept my crafty endeavors.
I love to teach classes and can be found teaching in my craft room as well as my local stores.
Thursday, December 19, 2013
Reindeer Tag
Good morning everyone, Steph here again with some wonderful products from The Stamp Doctor.
With the holidays quickly approaching, I thought it should create some tags. Tags are so easy to do with these products. Just stamp, die cut and you are done.
I used the reindeer die cut (which I absolutely LOVE), inking while it was still in the die. He was popped onto the tag after I covered it with some lovely Teresa Collins papers and the Stamp Doctor's Merry Little Christmas Circles stamp set. Some die cut holly leaves and twigs added a nice festive look.
Consider setting up an assembly line of all items you need and you can easily create any number of tags in no time at all.
Thanks for stopping by today.
Steph
With the holidays quickly approaching, I thought it should create some tags. Tags are so easy to do with these products. Just stamp, die cut and you are done.
I used the reindeer die cut (which I absolutely LOVE), inking while it was still in the die. He was popped onto the tag after I covered it with some lovely Teresa Collins papers and the Stamp Doctor's Merry Little Christmas Circles stamp set. Some die cut holly leaves and twigs added a nice festive look.
Consider setting up an assembly line of all items you need and you can easily create any number of tags in no time at all.
Thanks for stopping by today.
Steph
Welcome to my blog. I've been married to Gary for 40 years. We have a 25 year old Criminal Justice college grad and an 18 month old puppy.
I've been creating in some form since I was a child. It started with crochet, sewing, macramé and beading. Turning down a scholarship to the Fashion Institute of Technology, I became a business major managing several major corporations during my career; however, I always kept my crafty endeavors.
I love to teach classes and can be found teaching in my craft room as well as my local stores.
Sunday, November 24, 2013
Reindeer tags
Good morning everyone, Steph here again with some wonderful stamps from The Stamp Doctor.
I love tags and the products from The Stamp Doctor make it so easy to create some wonderful tags.
The background papers are from Theresa Collins and I cut them to fit the office supply tags I had. Inking the edges of all gives some nice dimension to the tags. The stamps are Large Merry (C026) which were stamped in brown ink on white cardstock. On the first tag, I used Spellbinders Large Circle dies (S4-114) to create the ring which I placed on a larger red circle die.
On the second tag, I used Spellbinders Large Circle dies (S4-114) to create the circle. The 3 Reindeer dies were the perfect size for the tags. I die cut them, then kept them in place while adding brown ink to them. I absolutely love them!!!
Thanks for stopping by today and be sure to carefully check out the store - there are so many wonderful products available.
Steph
I love tags and the products from The Stamp Doctor make it so easy to create some wonderful tags.
The background papers are from Theresa Collins and I cut them to fit the office supply tags I had. Inking the edges of all gives some nice dimension to the tags. The stamps are Large Merry (C026) which were stamped in brown ink on white cardstock. On the first tag, I used Spellbinders Large Circle dies (S4-114) to create the ring which I placed on a larger red circle die.
On the second tag, I used Spellbinders Large Circle dies (S4-114) to create the circle. The 3 Reindeer dies were the perfect size for the tags. I die cut them, then kept them in place while adding brown ink to them. I absolutely love them!!!
Thanks for stopping by today and be sure to carefully check out the store - there are so many wonderful products available.
Steph
Welcome to my blog. I've been married to Gary for 40 years. We have a 25 year old Criminal Justice college grad and an 18 month old puppy.
I've been creating in some form since I was a child. It started with crochet, sewing, macramé and beading. Turning down a scholarship to the Fashion Institute of Technology, I became a business major managing several major corporations during my career; however, I always kept my crafty endeavors.
I love to teach classes and can be found teaching in my craft room as well as my local stores.
Monday, October 28, 2013
Christmas Bag
Hello all and happy Monday!
Today I have a super cute and easy Christmas bag made using The Stamp Doctor Clear Stamps, Glitz paper and Spellbinder dies.
Spellbinders' Parisian Motifs (large doily die)
Spellbinders' Parisian Accents (two corner dies) cut 4 times for a total of 8 pieces
Spellbinders' Small Circles
Spellbinders' Small Scallop Circles
The Stamp Doctor Christmas Circles Stamps
Hope this inspired you!
L.E.
Today I have a super cute and easy Christmas bag made using The Stamp Doctor Clear Stamps, Glitz paper and Spellbinder dies.
Recipe
Glitz Christmas Paper PadSpellbinders' Parisian Motifs (large doily die)
Spellbinders' Parisian Accents (two corner dies) cut 4 times for a total of 8 pieces
Spellbinders' Small Circles
Spellbinders' Small Scallop Circles
The Stamp Doctor Christmas Circles Stamps
Video Tutorial
Direct youtube link: http://youtu.be/WUxFwVR6LzAHope this inspired you!
L.E.
Hi, my name is Luisa and L.E. are my initials. L.E. Paper Studio is my personal retreat to share paper-crafting projects and other inspiration.
Thursday, October 17, 2013
Take time.....
Good morning everyone, my name is Steph and I am thrilled to be designing for The Stamp Doctor as one of their newest EMTs.
Today, I am sharing my first post for The Stamp Doctor.
Fall is definitely in the air. I love the sound the leaves make as you walk on them. So I thought this card would be perfect to get everyone in the mood for fall. My card uses these wonderful fall stamps:
C054 LG Maple Leaf Set
A128 SM Maple Leaf Set
A129 Leaves Turn
I colored the leaves with Copic Markers, then fussy cut them to display on the card. I then mounted them on S4-293 Lacey Circles with foam adhesives for dimension. The sentiment was the perfect addition across the leaves.
Thanks for stopping by today and be sure to carefully check out the store - there are so many wonderful products available.
Steph
Today, I am sharing my first post for The Stamp Doctor.
Fall is definitely in the air. I love the sound the leaves make as you walk on them. So I thought this card would be perfect to get everyone in the mood for fall. My card uses these wonderful fall stamps:
C054 LG Maple Leaf Set
A128 SM Maple Leaf Set
A129 Leaves Turn
I colored the leaves with Copic Markers, then fussy cut them to display on the card. I then mounted them on S4-293 Lacey Circles with foam adhesives for dimension. The sentiment was the perfect addition across the leaves.
Thanks for stopping by today and be sure to carefully check out the store - there are so many wonderful products available.
Steph
Welcome to my blog. I've been married to Gary for 40 years. We have a 25 year old Criminal Justice college grad and an 18 month old puppy.
I've been creating in some form since I was a child. It started with crochet, sewing, macramé and beading. Turning down a scholarship to the Fashion Institute of Technology, I became a business major managing several major corporations during my career; however, I always kept my crafty endeavors.
I love to teach classes and can be found teaching in my craft room as well as my local stores.
Friday, September 27, 2013
Clear Stamps are 20% off!
Did you know that all the clear stamp sets are online in the shop AND are 20% off? Check them out online or in person when TSD comes to a stamping show near you.
Subscribe to:
Posts (Atom)