Showing posts with label Center Step Die. Show all posts

Monday, November 3, 2014

Hope you have a Bee-utiful day

Hi everyone, Steph Ackerman here today. 

I used the Stamp Doctor Center Step Card Die to create the card in one pass.  It cuts and scores so all you have to do is fold on the score lines and the card is ready to decorate


I used the Center Step Layers to easily die cut all the smaller pieces I needed for the card.
 
The stamp sets I used are C004 Balloon Bees and C017 Bee-utiful Day.
 
Head on over the store and pick up your dies today.  You will be so glad you did.


Tuesday, July 29, 2014

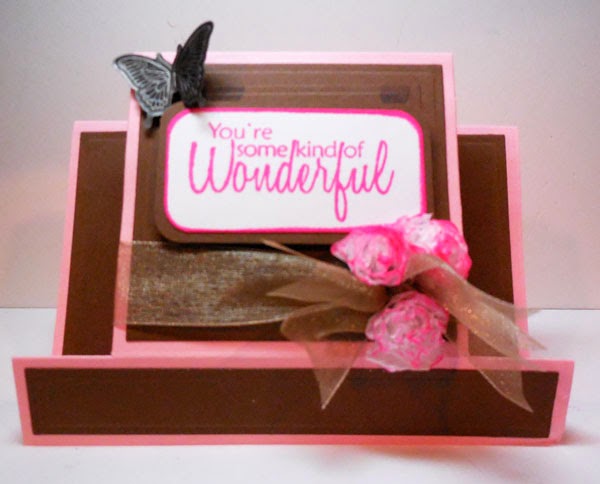
You're Some Kind of Wonderful

Hi everyone, Steph Ackerman here today with another card using lots of The Stamp Doctor dies and stamps:

Center Step Card Die
Center Step Card Die Layers
Bottle Cap and Flower Die Set
Simple Sentiments 2 Clear Stamps


Using the Center Step Card Die, I die cut the card from pink cardstock, then used the Center Step Card Die Layers to create the top layers using brown cardstock.  on the center panels, I stamped the smallest flower from Simple Sentiments 2 stamp set repeatedly to cover. 

Using the Bottle Cap and Flowers Die Set, I die cut approximately 8 layers of tissue paper in one pass and then formed flowers by adding a brad in the center and then fluffing up the tissue layers.  To add color, I lightly spritzed the flowers with water and dabbed some Clearsnap ink  on the flowers.

 
I mixed the flowers around some ribbon I tied around the card, then added the sentiment above which was also stamped with Clearsnap ink and then embossed with clear embossing powder.  A little metal butterfly was the perfect finishing touch.
 
Thanks for stopping by today.
 
Steph
 

Wednesday, July 16, 2014

You make me Smile Center Step Card

Hi everyone, Steph here with a card that was a huge hit at the Syracuse and West Springfield stamp shows. 

I used the Stamp Doctor Center Step Card Die to create the card in one pass.  It cuts and scores so all you do is fold on the score lines and the card is ready to decorate.


I used the Stamp Doctor Fleur de Lis die set, which is a set of 6 dies.  Cutting the central panel and side panels from cardstock, placed them on sticky back paper and added glitter to achieve the fun shimmery look.  You could also do this by placing glitter paper behind the cardstock.

 
The bottom border is also from the Fleur de Lis set, a delicate element that fits the card perfectly.
 
The sentiment is from Simple Sentiments and is a perfect fit in the center of my card.
 
Thanks for stopping by today.
 
Steph


Tuesday, November 19, 2013

Spellbinders Platinum Party!

https://spellbinderspaperarts.com/Community/Blog/Post/13-11-14/Hop_With_Us.aspx?Page=1&Blogs=Post 
We are happy to be participating in our first ever
Platinum Party Blog Hop with Spellbinders®!

Be sure to click the image above for complete rules
on how to complete your hop and be entered into the drawing for the GRAND PRIZE!


To create this card: 
1) Cut your Center Step Card from Kraft card stock.
2) Cut two strips of green plaid paper .75" x 6. 
    Cut one strip in half for each side. 
    Trim the additional strip to 5.25" for the bottom. 
3) Cut the center piece of green printed card stock to 3.25" x 4.00".
4) Stamp Family & Friends with black ink onto cream card stock.
     Allow to dry and cut out with Labels Seventeen.
5) Die cut a few sets of Poinsettias. I didn't use the larger one in the set.
    Just the 3 smaller ones.
    **Instead of using the regular embossing feature with the
         embossing mats, I used a stylus to create the embossed
         texture in the Poinsettias. This caused the paper to be a
         little shiny from the rubbing as opposed to just embossed.
    Roll the petals of the flowers over any rounded object to
    make them curl. Glue them together in the center.
    Add a crystal or gem.
6) Cut a few Sprigs out of green card stock. I love to use these
     paper pads because the papers are all so wonderfully coordinated!
     Just flip them over to use a corresponding color or print on the back!
7) Assemble the card. I usually just tear the Sprigs and poke them
    under the flowers, positioning them "just so". :0)

I hope you enjoyed my first ever tutorial
for a blog hop! Thank you for visiting
and don't forget to click here
for your entry into the Grand Prize Drawing!


I created this fun and easy card
using the following products:
Graphic 45 12 days of Christmas (6x6 paper pad)
Center Step Die (The Stamp Doctor)
Labels Seventeen Spellbinders® Die Set
Poinsettia Spellbinders® Die Set
Sprigs Spellbinders® Die Set
Family & Friends Stamp (The Stamp Doctor)
(all products are available from The Stamp Doctor, of course!)
I also used kraft card stock for the card base, cream card stock for the stamped image, a few Swarovski Crystals and my favorite glue, MegaTack™.

Here is the complete list of blogs you must visit to complete the hop:

November 20th
(for Fun Stampers Journey)

(for Tsukineko)

(for Want2Scrap)

(for JustRite)

(for Heartfelt Creations)

(for The Stamp Doctor)

 
November 21st
(for Fun Stampers Journey)

Allie Gower My Card Party http://wp.me/p2Ys5f-Ai 
(for Want2Scrap)

(for JustRite)

 (for Heartfelt Creations)

(for Tsukineko)
Steph Ackerman http://stephaniescraps.blogspot.com 
(for The Stamp Doctor)